Avlis Command Prompt
| Systems and Tools |
Help
Format:
/help parameter1
- Displays a server help message about ACP commands and usage.
- Parameter1 (Default =
list): Displays help on a specific Avlis Command Prompt topic.
ahs- Help about available holy symbol commands.ammo- Help about available ammunition commands.ams- Help about available AMS commands.brs- Help about available barbarian rage specializations commands.chat- Help about available Chat commands.check- Help about available check (information) commands.cts- Help about available companion training system commands.description- Help about available description commands.emote- Help about available emote commands.list- Descriptions of available ACP commands and how to use/helpitself (This is the default if parameter1 is not included).lfp- Help about available Looking for Party (LFP) commands.loot_order- Help about available Loot Randomizer commands.magic- Help about available magic commands.psi- Help about available Psionics commands.roll- Help about available dice roll commands.
Example:
/help ams- Displays help about available AMS commands.
AFK XP
Avlis grants what we colloquially call AFK or Vault XP, which is XP that gradually accumulates on characters that aren't logged in. The intent of this is to provide some parity between the hard core players and the more casual players. This toggle allows players to turn that off, by character.
Format:
/afkxp parameter1
Parameter1 (Must be included)
on- the default setting; characters not logged in still gain incremental XP.off- turn off incremental XP for offline time.
Alias
Format:
/alias parameter1
It is now possible for PCs to set an alias that changes what is shown in chat, in the party list, and on the character sheet. Abuse of this system will bring the pain.
Intended Use
- You are a disguised PC in some fashion and want to make it easier to RP being disguised.
- You are a changeling and want your name (proper noun name) to match your current form (see Rule 3).
- Your PC is now married, divorced, goes by a different name for another valid reason.
Rules
- You may not impersonate another PC by taking their name.
- You may not impersonate an NPC.
- You may not use a generic name to seem like an NPC (i.e. Mangy dog, Peasant, cat).
- You may not convey OOC information (i.e. afk, lfg, brb).
Parameter1 (Must be included)
/alias help- Print out help on how to use the commands./alias set <Name Goes Here>- (omit the < >) Sets and enables your alias so that you and other PCs see your alias name instead of your actual PC name./alias check- Check what alias you currently have saved in the DB for your PC./alias on- Enable your saved alias as what you and other PCs see./alias off- Disable your saved alias, you and other PCs will see your actual PC name as usual./alias clear- Set your alias in the DB to a blank string and disable it, you and other PCs will see your actual PC name as usual.
Ammunition Management
Format:
/ammo parameter1
- Ammunition management system allows the user to select a bag (or a specific stack) ammo is taken from when the current stack runs out, instead of relying on BioWare's auto-selector. The Ammunition Management System page has more details.
- Parameter1 (Must be included):
toggle- Toggles between disabling and enabling the different modes used by the ammunition management system.queue- Queues a bag or stack of ammunition (must be selected using Player Tool 10 prior to this command).combat- Toggles whether or not to disengage from combat when exhausting all queued ammunition, rather than falling back to the BioWare mode (using the next available unqueued stack of ammunition). Should the user re-engage combat without first equipping and queuing more ammunition, the system will fall back to BioWare mode without breaking combat, until the next stack is exhausted.clear- clears/resets all ammo management settings
Example 1:
/ammo toggle- This will switch through "Disabling managed mode", "Enabling managed mode: Container based" and "Enabling managed mode: Tag based".
Example 2:
/ammo combat- If the current setting is "Remains in combat after exhausting queued ammunition", it will set it to "Exits combat after exhausting ammunition" (and vice-versa).
AMS
Format:
/ams parameter1 parameter2 parameter3 parameter4
- Commands available to different Advanced Mage Specializations (AMS). All parameters are not required in every case (see the examples). These commands are only used if you have the specific AMS for the specific command, and the required level in it. See the Advanced Mage Specialization page for more information.
- Parameter1 (Must be included):
whitenecro- Toggles White Necromancy AMS between enabled and disabled. Can be specifically set by addingonoroffas parameter2.transmutant- Toggles Transmutant AMS between enabled and disabled. Can be specifically set by addingonoroffas parameter2.psimageorpsiorpsimagic- Depending on the parameters following this, it is used to enable/disable psionic augmentation, psionic energy substitution or psionic metamagic.
- Parameter2:
on- Sets White Necromancy or Transmutant AMS to enabled.off- Sets White Necromancy or Transmutant AMS to disabled.augment- Ifonoroffis added as parameter3, this will enable or disable psionic augmentation. Unlike other AMS commands, there is no toggle between enabled and disabled, so theonoroffparameter3 is required.suborelement- Toggles the psionic energy substitution type specified in parameter3 between enabled and disabled. Can be specifically set by addingonoroffas parameter4.metamagicormeta- Toggles the psionic metamagic type specified in parameter3 between enabled and disabled. Can be specifically set by addingonoroffas parameter4.
- Parameter3:
on- Sets psionic augmentation to enabled.off- Sets psionic augmentation to disabled.
- The following parameter3 commands for psionic energy substitution and psionic metamagic types are used to toggle between enabled and disabled. They can be specifically set by adding
onoroffas parameter4. acidcoldelectricorelectricalfiresonicextendempowermaximize
- Parameter4:
on- Sets the specified psionic energy substitution or psionic metamagic type to enabled.off- Sets the specified psionic energy substitution or psionic metamagic type to disabled.
Example 1a:
/ams whitenecro- If the current setting for White Necromancy is enabled, it will set it to disabled (and vice-versa).
Example 1b:
/ams whitenecro on- Sets White Necromancy to enabled.
Example 2:
/ams psi augment on- Sets psionic augmentation to enabled.
Example 3a:
/ams psi sub electrical- Toggles the psionic energy substitution type electric between enabled and disabled.
Example 3b:
/ams psi sub electrical off- Sets the psionic energy substitution type electric to disabled.
Example 4a:
/ams psi meta maximize- Toggles the psionic metamagic type maximize between enabled and disabled.
Example 4b:
/ams psi meta maximize on- Sets the psionic metamagic type maximize to enabled.
Barbarian Rage Specializations
Format (without "[ ]" brackets):
/brs parameter1 [text|number]
- Parameter1 (Must be included):
list- Lists all shouts currently stored. Provides shout ID numbers.add- Adds a new shout with the specified [text].del- Deletes an existing shout with the specified [shout ID number].
Example (Delete shout by ID):
/brs del 2will delete the shout with ID 2, as seen in/brs list.
- Standalone (No parameter1)
/brs- Tells you the proper syntax for using this command to list, add and delete custom shouts.
Changeling Management
Format:
/changeling
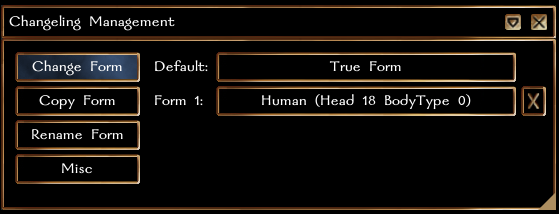
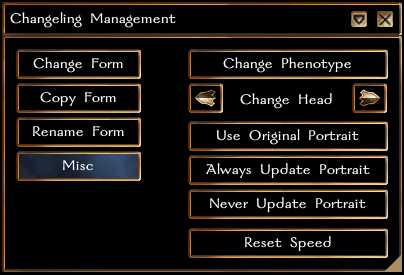
Changelings can manage forms with a NUI that allows all of the capabilities of the chat commands and radial methods but that ALSO adds the ability to change phenotype, change heads, coordinate portraits per form, and rename saved forms to manage multiple personalities.
If you prefer to use the chat commands, they are:
/changeling parameter1 [number]
- Parameter1:
list- Lists saved forms.change [number]- Change to a saved form by form number.purge [number]- Purge (delete) a saved form by form number.
Character Portrait
Format:
/pickportrait
- This will display a UI (preview) that allows you to set your PC/NPC/DM avatar's portrait, revert changes you've made, page through portraits available in-game, and an input box to type in custom portrait names from your portraits folder or the toolset.
Chat
See Chat on the Avlis forums for more information (or use /help chat).
Main Chat Commands
Format (without "[ ]" brackets):
/chat [player or character name] [message]or/c [player or character name] [message]/reply parameter1
- Parameter1 (Must be included):
/reply [message]or/r [message]/reply ±notifyor/r ±notify
- Standalone (No parameter1)
/reply
- Chat is much like the Looking for Party (LFP) system, but for private messages across servers. Colors chosen with the
/pcolorLFP command will apply to any/chatmessages as well. You can also use the Player List/whocommand to find player/character (and DM) names on other servers.
- Use
/chat(or/c) to send the player/character name your message. The first time you receive one of these from another player, a little tutorial message will pop up as well.
- Note: You don't need to spell out the full name: any uniquely identifiable sub-string will work. E.g.,
/chat to [message]will match the names like Tor and Gortog, and send the message if there are no other names with that sub-string. If there are, a list of those matching names is returned instead.
- The
/replycommand will automatically designate the last player to send you a chat message, so no names need be entered. This is persistent across server transition (and when relogging). Enabling the notify option via+notifywill inform you if your/replytarget will change. You can disable this option using-notify. If you want to confirm who you are replying to, type/replyor/rand press Enter.
Other Chat Commands
Format (without "[ ]" brackets):
/history [player or character name]- Shows chat history for this player or character (a partial match will suffice)./history [lfp] [number]or/h [lfp] [number]- Displays chat messages you’ve recently sent and received./pcolors- Displays all possible player name colors for LFP./pcolor [#]- Sets your player name to the color chosen (by number)./ignore [player or character name]- Ignores (hides) chat messages from a specific player./unignore [player or character name]- Unignores (shows) chat messages from a specific player again./ignored- Lists the players you are currently ignoring.
- The
/historycommand displays all chat messages you’ve recently sent and received. Like the LFP system, chat uses the server log to display messages, so the history command is useful when you suspect you've missed a chat in a torrent of combat messages.
- The optional lfp parameter will show LFP history messages, as well chat ones. Bringing up the history for LFP messages also shows messages sent from before logging in, making it useful for getting right into crumping with a group that's already forming. This will work with the number parameter below.
- The optional number parameter can limit (or increase) the message history output. By default, the
/historycommand displays up to 25 of your most recent messages, but the number parameter changes that.
- Note: that history is periodically purged (every 8 hours or so), so don't be alarmed if you don't see every message you've ever been sent.
- The
/ignorecommands that are part of LFP also work with the chat system. Players are not informed if you're ignoring them, so don't worry about offending anyone.
Example 1:
/chat Tor Heya! What's up?or/c Tor Heya! What's up?- Sends Tor Varson the message: "[CHAT] Your PC Name: Heya! What's up?" in his server window.
Example 2:
/reply There be nithlings in Zvid again.or/r There be nithlings in Zvid again.- Sends you the reply from Tor: "[CHAT] Tor: There be nithlings in Zvid again." in your server window.
Example 3a:
/historyor/h- Displays the 25 most recent chat messages sent and received.
Example 3b:
/history 10or/h 10- Displays the 10 most recent chat messages sent and received.
Example 3c:
/history lfp 30or/h lfp 30- Displays the 30 most recent chat and LFP messages sent and received.
Example 4:
/pcolor 12- Sets your player name color to the 12th one listed in/pcolors.
Example 5:
/ignore damar ogdem- Hides all messages from the player of Damar Ogdem (Sunscream).
Companion Training System (CTS)
See the Companion Training System Mechanics page for a description of all commands.
Clerical Holy Symbols
The following commands allow for saving and managing prayer phrases, to go with your Clerical Wieldable Holy Symbol:
/ahs- Command overview./ahs list- Shows all your saved prayers in a numbered list./ahs add [prayer text]- Adds the prayer to your list./ahs del [#]- Deletes the prayer from your list (numbers are visible from "/ahs list").
Crafting Plant Harvesting
Format:
/harvest_toggle
You can harvest all or just one item from plants. To switch between modes, type /harvest_toggle
NOTE: if you choose to harvest one component, you will truly only be able to harvest one, not one at a time. So if you go to an apple tree and try to harvest apples normally you will get six apples until the tree respawns more apples. If you use /harvest_toggle you will only get one apple until the tree respawns. You will NOT get six apples one at a time.
Create/Remove Items
Format:
/create ui
- This will display a UI that allows creation or removal of a Tent, Campfire, Cauldron Cookfire, Spit Cookfire, and Bedroll. The campfire can be used as a trash can.
Debug
Format:
/debug
- No target it will return area info. Target an item with Player Tool #10. Returns a server message with the item/current area name, tag, and resref.
Description
Method 1 - Format:
/setdescription(PCs)/setdescription companion(Ranger or Druid companions)/setdescription familiar(Wizard or Sorcerer familiars)
This will display a UI (preview) to set your PC/NPC/DM, your companion, or your familiar description. It has an input box which is about the size of the Examine window's text. It also has 3 buttons to set the description, undo changes you've made to the description since opening the UI, and reverting the description back to what it was at character creation.
Note: This is compatible with descriptions added/modified via the text-based /description command below. i.e. there are 2 ways to accomplish the same thing.
Method 2 - Format (without "[ ]" brackets):
/description parameter1 [text_description]
- Parameter1 (Must be included):
new- Changes a PC's description to the new [text_description].add- Adds [text_description] to the existing custom description without adding a new line.paragraph- Adds [text_description] to the existing custom description, after adding 2 line breaks (creates a blank line between the text).restore- Reverts any custom descriptions changes, and restores a PC's original description.nui- Evokes the graphic user interface (see: NUI) to make PC description changes.
Example 1 (New description):
/description new This is my new description.will change your description to "This is my new description.".
Example 2 (Add text to existing description):
/description add My added description text.will add "My added description text." to the existing description without adding a new line first.
- Tip: Normally you can't add line breaks from the chat line (unless you use \n or other special characters), but the paragraph parameter below will simplify the process.
Example 3 (Add new lines):
/description paragraph My new description paragraph.will add 2 new lines (\n\n) and then "My new description paragraph." to the existing description (as new paragraph).
Example 4 (Restore description):
/description restorewill undo any changes to the original description (restores it).
Extra: You can even try colored ALT-codes and see if they work in the description. See: Goth Girl's Color Tag Creator V2 (+ Carcerian's Color Code Mini-Tutorial)
- Tip: You can also use the Self Examine (
/self) command to see your description changes.
Devastating Critical (Dev Crit)
Format:
/devcrit- This is a player toggle that enables a player to toggle between Standard Dev Crit and Avlis Dev Crit.
- Avlis Dev Crit specifics
- Fort save vs double damage
- The DC of the save is the same DC as the PC would have on Standard Dev Crit
- Double damage is ONLY applied on a failed save
- Crit immune creatures are still crit immune
Dice Rolls
NUI Format:
/roll ui
- This command launches the dice roller, allowing ability, saving throw, and skill checks, as well as player selected dice rolls. If you prefer the older chat method, the commands are below the image.
Chat Format:
/roll parameter1 parameter2 parameter3 parameter4
- Dice rolls using ACP have 4 available parameters. Parameter2 can be left out for saving throws and ability checks (only required for skill and dice rolls). Parameter1 and parameter4 have default values that don't need to be entered unless you want to change them (see the examples below and the parameter list for default values).
- To make a roll only seen by DMs,
privatemust be the first parameter, otherwise the roll result will be spoken in regular chat. The second parameter chooses between a save, skill or ability check, or doing an unmodified dice roll (redundant when doing a saving throw or ability check, so it can be left out for them). The 3rd parameter selects the type of save, skill, ability or dice size (This parameter is always required). The 4th parameter is used to set how many dice to roll only for an unmodified roll, if more than one is needed.
- Parameter1 (Default is public*): Private or public results.
private- This optional parameter will send the roll result to the DM channel only. If it isn't included, the results will be spoken in regular chat.- *There is no "public" parameter (it is assumed when
privateis not included) so do not try use it. The results will be unpredictable, and cause an error.
- Parameter2 (Required only for skill and dice rolls): Specify the type of roll.
save- Specifies the type of roll being made is a saving throw (optional when parameter3 is a valid save type).skill- Specifies the type of roll being made is a skill check.ability- Specifies the type of roll being made is an ability check (optional when parameter3 is a valid ability).dice- Specifies the type of roll being made is an unmodified dice roll.
- Parameter3 (Must be included): Specifies the save, ability, skill or size of dice to roll.
- Saving Throw (save):
willfortitudeorfortreflexorref
- Skill Check (skill):
animalempathyoraeappraisebluffconcentrationcraftarmorcrafttrapcraftweapondisableordt(disable traps)disciplineordischealhideintimidatelistenloremovesilentlyormsopenlockorlockpickorpicklockorolparryperformpersuadepickpocketorppridesearchsettraporstspellcraftspottaunttumbleumd
- Ability Check (ability):
strengthorstrdexterityordexconstitutionorconintelligenceorintwisdomorwischarismaorcha
- Unmodified Dice Roll (dice):
d2d3d4d6d8d10d12d20d100
- Parameter4 (Default =
1): How many dice to roll for unmodified rolls only.
- Any valid integer (
0or negative numbers are changed to1).
Example 1a:
/roll private save willor/roll private will- roll a d20 with your will save modifier and send the result to the DM channel (specifying the type of rollsaveis unnecessary).
Example 1b:
/roll save willor/roll will- roll a d20 with your will save modifier and speak the result in regular chat.
Example 2:
/roll save refor/roll save reflexor/roll ref- roll a d20 with your reflex save modifier and speak the result in regular chat (see the parameter list for optional shorted versions of many commands).
Example 3:
/roll private skill hide- roll a d20 with your hide skill modifier and send the result to the DM channel.
Example 4:
/roll ability dexor/roll ability dexterityor/roll dex- roll a d20 with your dexterity ability modifier and speak the result in regular chat (specifying the type of rollabilityis unnecessary).
Example 5a:
/roll dice d20or/roll dice d20 1- roll 1d20 and speak the result in regular chat (1is the default for number of dice to roll, so it can be left out).
Example 5b:
/roll dice d6 4- roll 4d6 and speak the totaled result in regular chat.
Emotes
NUI Format
/emote ui
- This command launches the 2-page NUI shown below, allowing you to emote at the click of a button, handily grouped by category.
Chat Format (without "[ ]" brackets):
/emote sit [chair]
- Sit on the ground, or in the nearest chair if specified. The optional chair parameter also works for many placeable seats that aren't normally usable.
Example 1:
/emote sit- Sit on the ground.
Example 2:
/emote sit chair- Sit in the nearest chair, couch or throne if it isn't already occupied.
Fashion
Format:
/edit fashion
- This command launches a targeting cursor which you use to click on the equipped fashion item in your inventory. Clicking launches the NUI shown below, allowing you to scale, rotate, and move your fashion accessory to fit your PC.
Feat
Format:
/feat parameter1
- Triggers the feat for use on the currently selected target without the need for re-clicking the target. Ideal for quickslots.
- Parameter1:
calledshotarm- Called Shot to the arm.calledshotleg- Called Shot to the leg.disarm- Disarm or Improved Disarmknockdown- Knockdown or Improved Knockdown
HiPS VFX
Format:
/sdvfx
- Toggles the Shadowdancer puff of smoke VFX for Hide in Plain Sight on/off.
Horse Conversation
Format:
/horse
- Starts the horse conversation with assigning and mount options.
Information
NUI Information Format:
/pcinfo- Opens a NUI window that provides the same functionality as all commands listed at the bottom of this Information section. Currently displayed section can be printed to your log using the Log Report button.
Old Chat Command Style Information Format:
/check parameter1
- Displays a server message with the current status of parameter1.
- Parameter1 (Must be included): Selects what to check.
survorsurvivalorsurvivalist- Displays current survivalist level and experience gained.ragexporrageorbrs- Displays current rager type, level and experience gained.magic- Displays any and all of the following, if applicable: AMM membership status, AMS ranks, Vortex ranks, Favored (by a deity) status, Out of Favor (with a deity) status, Favored Psion status, Paladin status and ranksbart- Displays current Bartending level.craftingorcraftxp- Displays current crafting levels and experience gained in each craft.tokenortokens- Returns a server message with current "Gem", "Metal" and "Organic" Avlis recycling token totals.hide- Brings a pop-up window displaying your PC Hide, including custom race feats, skills and statistics, Avlis tools implemented as feats, Jali's Reading Glass bonuses, etc.xporXP- Check experience points (XP) information, such as remaining XP toward the weekly cap, weekly reset time etc. See also: Experience System
Example 1:
/check brs- Displays current rager type, level and experience.
Example 2:
/check craftxp- Displays current crafting levels and experience.
IRC Style Emotes
Format (without "[ ]" brackets):
/me [text to emote]
- Adds the speaker's name to the start of the text, encloses it in * * and changes the color to orange.
Example:
/me seems hungry- If the speaker's name is Fred, it will say *Fred seems hungry* in orange letters.
Label
Format:
/label
- Target an item using Player Tool 10 from the radial menu then use this command to see who artificed or crafted it.
Looking for Party
Main LFP Commands
Format:
/lfp parameter1
- Looking for Party (LFP) is an in-game (cross-server) chat channel, dedicated to organizing parties, similar to IRC (though all communication is done internally by the servers). Anyone connected to this OOC channel can chat with each other, no matter what server they are on. Please see the Looking for Party (LFP) news topic on the Avlis forums for guidelines about acceptable use of LFP chat.
- Parameter1 (Default when omitted = Displays a list of who is connected to LFP):
on- Enables the LFP channel.off- Disables the LFP channel.help- Shows the help text for LFP.
- Any other text following
/lfpis sent as a (server) message to everyone connected to LFP (see Example 1b).
Other LFP Commands
/pcolors- Displays all possible player name colors for LFP./pcolor [#]- Sets your player name to the color chosen (by number)./ignore [player or character name]- Ignores (hides) LFP messages from a specific player./unignore [player or character name]- Unignores (shows) LFP messages from a specific player again./ignored- Lists the players you are currently ignoring.
- The
/ignorecommands and colors set by/pcolorare also shared with the Chat system. Players are not informed if you're ignoring them, so don't worry about offending anyone.
Example 1a:
/lfp- Displays a list of who is connected to LFP.
/lfp anyone interested in some hot bugbear action?- Sends "anyone interested in some hot bugbear action?" to all players connected to LFP.
Example 2:
/pcolor 12- Sets your player name color to the 12th one listed in/pcolors.
Example 3:
/ignore damar ogdem- Hides all messages from the player of Damar Ogdem (Sunscream).
Loot Randomizer
Format (without "[ ]" brackets):
/lootorder [number]or/loot_order [number]
- This command can only be used by a party leader. It will do a secret roll of a d100 for all PCs in the party, and return a list of names in order, from the highest to lowest roll (names only).
- The optional number parameter will return only that many rollers, from the top of the list order (highest to lowest).
- Note: This will work regardless of whether or not the party members have Looking for Party (LFP) activated.
Example 1:
/lootorder- returns a list of names in order, from the highest to lowest roll.
Example 2:
/lootorder 5- returns a list of the top 5 names in order, from the highest to lowest roll.
Lycanthropy
See the Lycanthropy page for more information.
Animal/Hybrid Default Form Toggle
Format:
/lform
- Toggles between animal and hybrid as the default form type used by true lycans.
Example:
/lform- If the current setting is "Your default form is now set to animal." it will be changed to "Your default form is now set to hybrid." (and vice-versa).
Lycanthropy Transformation Command
Format:
/lycan parameter1or/lyctrans parameter1
- Used by true lycans to change into were-form. If parameter1 is not included, the default animal or hybrid form type (set by
/lform) will be used instead.
- Parameter1 (Default = "set by
/lform"): Specifies which form type to use.
animal- Animal form used.hybrid- Hybrid form used.
Example 1a:
/lycanor/lyctrans- Transforms a true lycan into the default form (animal or hybrid) set by the/lformcommand.
Example 1b:
/lycan hybridor/lyctrans hybrid- Transforms a true lycan into hybrid form.
Magic
Create Magic Tattoo
- Type
/help magic tatto get all options for spell Create Magic Tattoo
- Type
- Format:
/magic tat parameter1
- Parameter1:
1ab- +1 attack bonusac- +1 armor classreflex- +2 reflex savefort- +2 fort saveswill- +2 will savesaves- +2 to all saving throws2ab- +2 attack bonussr- spell resistancestr- +2 STRdex- +2 DEXcon- +2 CONint- +2 INTwis- +2 WIScha- +2 CHA
Gate
- See the Magic:Gate page for spell specifics.
- Format:
/magic gate parameter1
- Parameter1:
clear|null|remove- Any of these three parameters will clear your selection.LG- Lawful Good ArchonNG- Neutral Good LupinalCG- Chaotic Good HawkLN- Lawful Neutral FormianTN- True Neutral GolemCN- Chaotic Neutral SlaadLE- Lawful Evil Pit FiendNE- Neutral Evil UltrolothCE- Chaotic Evil Balor
- This command allows a caster to preset their summons so that casting during combat is a single click (without menu). The preset persists across servers and resets. If unset, a NUI pops up to allow selection.
Pale Master Summons
- Format:
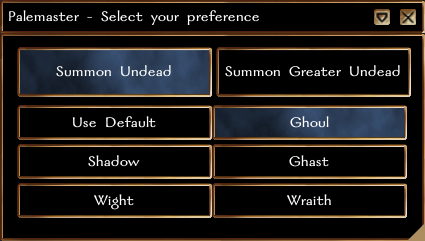
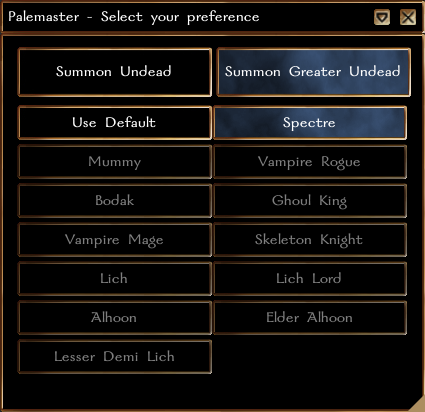
/magic pm
- This command launches a NUI that allows a Pale Master to preset their summons for Summon Undead and Summon Greater Undead. The preset persists across servers and resets.
Spellcasting Widget
- Format:
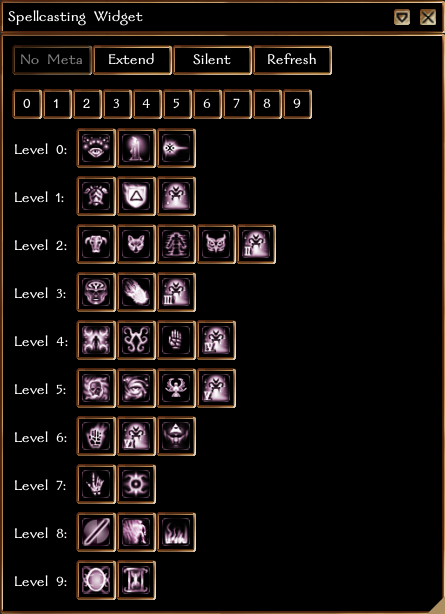
/magic spellui
- This command activates a NUI that displays all of your memorized spells. Casting is as easy as clicking the icon you want and clicking your target
Summon Creature
- Format:
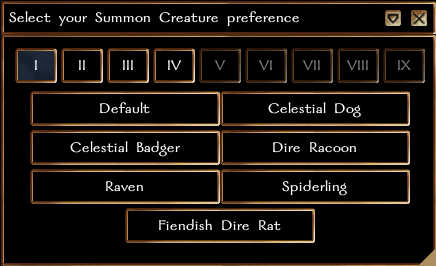
/magic summon
- This command launches a NUI that allows a caster to preset their summons for Summon Creature (any level). The preset persists across servers and resets.
Monk Signature Moves
See the Monk Signature Moves page for more information.
Format:
/sigmov parameter1
- Parameter1:
list- This will list all of the Moves that you have learned as well as list your current school.N- This will allow you to perform a Signature Move, where N is the number of the move. In order to perform a move, you must first learn it.xp- This will tell you how much Signature Move XP and how many Signature Move levels you have, as well as your monk's current school.switchschool X- This will allow you to switch schools, where X is the school number.
Example:
/sigmov 1will allow you to perform Signature Move 1.
Petrification Kill Switch
Format:
/petrifydeath confirm
- This command was introduced as an option to exit petrified state (eg. caused by the Flesh to Stone spell or a similar effect). Type
/petrifydeath confirmto begin your character's Death Travel process.
Player List
Format:
/who
- Type
/whoto get a list of characters (and their players) across the Avlis servers. Ordered by server name, character name, player name.
- Note: An [LFP] tag next to a name indicates that the player is connected to the Looking for Party channel.
PrC Holy Warrior Smite Evil
Format:
/smite
- PrC holy warriors (Equalizer/Champion/Avenger) can use this command to smite evil. It includes a bug workaround for the missing/disabled feat caused by the 1.69 NWN update.
Psionics
Format:
/psi
Provides access to a variety of psionic-system options. Requires at least one level of psion to access.
- Examples:
/psi helpgives a list of all implemented commands.
Extended Dimension Door
/psi ddoor parameter2or/psi dimdoor parameter2
- Toggles "extended psionic dimension door"* between enabled or disabled. Parameter2 can be set to either
onoroffto force the setting, but isn't required. Only usable if you have the psionic power (including items), not the arcane spell by the same name.
- "Extended psionic dimension door" creates placeable portal doors that remain as long as the caster has PsPs to maintain it, and can be used by any PC to go through. Only used for "psionic" dimension door, and not the arcane spell by the same name.
- Examples:
/psi ddoor- If the current setting for "extended psionic dimension door" is enabled, it will set it to disabled (and vice-versa)./psi ddoor on- This will set "extended psionic dimension door" to enabled./psi ddoor off- This will set "extended psionic dimension door" to disabled.
Metamorphosis
/psi metamorph parameter2or/psi meta parameter2
- Selects whether metamorphosis will trigger change into a standard or alternate form, by setting parameter2 to one either
standard(std) oralternate(alt).
Summon Planar Creature
/psi summon parameter2or/psi spc parameter2
- Sets the Good/Neutral/Evil alignment of the summoned creature, by setting parameter2 to one of the alignments. Setting parameter 2 to
noneresults in a random summon from across the alignment spectrum.
- Examples:
/psi spc evil- This sets the selection of summoned creature to only those of evil alignment/psi spc good- This sets the selection of summoned creature to only those of good alignment
Ultrablast
/psi ultrablast parameter2
- Alters the behavior of the Ultrablast power by setting parameter2.
- Examples:
/psi ultrablast stun- Setting parameter 2 tostunordisableresults in no damage to the knocked out target./psi ultrablast kill- Setting parameter 2 tokillordamagewill incur damage to a knocked out target.
Psionic Augmentations
Note: These commands will not work in combat. They can be chained into a single command such that multiple Augmentations will apply to the next power (for increased PSP cost). Using 'harness' in a chained command reduces the PSP cost, it does not set it to zero.
/psi harness- Psion level 5+, triggers 'harness subconscious' (next attempted power has zero PSP cost). Can only be used once per rest./psi focus- Psion level 10+, triggers 'meditative focus' (next attempted power auto-passes the power check)/psi prolong- Psion level 15+, triggers 'prolong' (doubles duration of next attempted power - only works if power has duration, Stasis Field is exempt)/psi magnify- Psion level 21+, triggers 'magnify' (doubles effect size (e.g. damage) of next power - only works if power has an effect that can be doubled)- Examples of chained commands:
/psi prolong focus- next power both prolonged and auto-passes the power check/psi prolong focus harness- as above, but with a reduce PSP cost
/psi meditate- places the Psion in meditation animation (for 1-10 rounds, syntax is/psi meditate [number of rounds])
Ranger Weapon Dipping
See the Ranger page for more information.
Format:
/rangerdip parameter1
- Parameter1:
bag- This will designate a bag in which the ranger places the materials into which the ranger dips his weapons.N- This will allow you to choose the race against which the ranger is applying the material to his weapon. Refer to the table below for a list of races and the materials the ranger can use against them.
| N | Race | Material |
|---|---|---|
| 1 | Dwarf | Potion of Endurance |
| 2 | Elf | Potion of Cat's Grace |
| 3 | Gnome | Potion of Fox's Cunning |
| 4 | Halfling | Rogue's Liquor |
| 5 | Half-Elf | Nanshaquist |
| 6 | Half-Orc | Potion of Ironguts |
| 7 | Human | Potion of Luck |
| 8 | Aberration | Potion of Clarity |
| 9 | Animal | Pelar's Tonic |
| 10 | Beast | Dire Animal Blood |
| 11 | Construct | Acid Bomb |
| 12 | Dragon | Dragon Blood |
| 13 | Goblin | Draught of Toran |
| 14 | Monstrous Humanoid | Forian's Tonic |
| 15 | Orc | Orcish Apple Cider |
| 16 | Reptilian | Potion of Death Armor |
| 17 | Elemental | Elemental Decoction |
| 18 | Fey | Potion of Eagle's Splendor |
| 19 | Giant | Potion of Bull's Strength |
| 20 | Magical Beast | Potion of Displacement |
| 21 | Outsider | Potion of Bless |
| 22 | Shapechanger | Narin's Lycanthropic Cure |
| 23 | Undead | Holy Water |
| 24 | Vermin | Fire Bomb |
Example:
/rangerdip 1will allow you dip ammunition or a thrown weapon in a Potion of Endurance to grant it a temporary damage bonus against dwarves.
Recycling (Tokens)
- To convert tokens into chits, or chits into tokens, use the
/tokencommand:
Format:
/token parameter1 parameter2 parameter3
- Parameter1:
depositwill convert chits into tokenswithdrawwill convert tokens into chits
- Parameter2:
Specify the type of tokens from those currently existing in the Recycling System, such as:
gemsmetalorganic
- Parameter3
all[number]
This is the number of chits you want to convert into tokens, or tokens into chits. Chits will spawn into your inventory as items with a maximum stack size of 50.
Example 1:
/token deposit gem 15will convert 15 gem chits into gem tokens.
Example 2:
/token withdraw metal 30will convert 30 of your metal tokens into metal chits.
Example 3:
/token withdraw organic allwill convert all of your organic tokens into organic chits.
Note: A previous version of this command required the use of Player Tool 10. It is no longer required in the current implementation.
Rest Confirmation
Format:
/restconfirm
- Toggles a NUI confirmation window on/off requiring you to confirm that you want to rest.
- State of the toggle (on/TRUE or off/FALSE) is displayed in the server message window when typing the command.
Save Character
Format:
/save
- Saves your character file to the vault and your current location on the server.
Self Examine
Format:
/self
- Opens an examine window for the PC executing the command. Normally self examining isn't an option for PCs, unless they quick-slot the command before using it on themselves, so this is simply a shortcut for it.
- Tip: Useful when editing your Character Description.
Speed Toggle
Format:
/speed_toggle
- Allows monks of 3rd or higher level to toggle their speed bonus on or off.
Spellbooks
Format:
/spellbook parameter1 parameter2 parameter3 parameter4
- Saves, loads, deletes or lists PC spellbooks. Parameter2, parameter3 and parameter4 are not used when parameter1 is
list. Parameter2 and parameter3 are always required when using any other parameter1, while parameter4 can use its default value.
- Parameter1:
save- Saves your PC's current spellbook configuration to a name of your choice (a single level of spells can be saved using parameter4).load- Loads the spellbook configuration into your PC's spellbook (optionally you may only load a single level of spells using parameter4).delete- Deletes a saved spellbook configuration (this ignores the parameter4 level value, and all levels of spells are always deleted).list- Displays a list of your saved spellbook configurations.
- Parameter2: The name of the spellcasting class (only the first 3 letters are used).
cleorcleric- Clericdruordruid- Druidpalorpaladin- Paladinranorranger- Rangerwizorwizard- Wizard (also used by sorcerer and bard)
- Parameter3: The name of the spellbook.
- Any single word name may be used (no spaces, or the extra words will be used as additional parameters).
- Parameter4 (Default =
all): A specific level of spells to load or save.
0to9- Load or save the specified level of spells.all- Load or save all spell levels (This is the default if parameter4 is not included).
Example 1a:
/spellbook save wizard partybuffs allor/spellbook save wizard partybuffs- Saves your PC wizard's spellbook configuration as "partybuffs" (Thealllevel parameter4 is the default when omitted).
Example 1b:
/spellbook save wizard partybuffs 9- Saves only the 9th level spells to your PC wizard's spellbook configuration as "partybuffs". Note: If the "partybuffs" spellbook already exists, only the 9th level spells will be updated in it (nothing else is changed or removed).
Example 2:
/spellbook load cleric undeadpwn 7- Loads only the 7th level spells from your PC cleric's spellbook configuration previously memorized as "undeadpwn".
Example 3:
/spellbook delete ranger sneakyspells- The entire "sneakyspells" ranger spellbook is deleted (you cannot usedeleteon specific levels of spells, though you cansavean empty level of spells as an update).
Example 4:
/spellbook list- Displays a list of your saved spellbook configurations.
Text Colors
Format (without "[ ]" brackets):
/blue [text to color blue]/red [text to color red]/green [text to color green]
- Changes the text entered in chat to the specified color.
Example:
/green This is green- Changes the color of "This is green" to green text.
Timezone Clocks and Converter
Format:
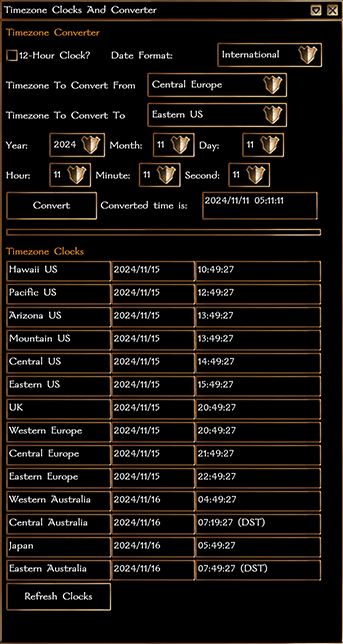
/clock
- This command activates a NUI that allows you to convert from any time zone in the real world to any other time zone in the real world. The display is customizable to your preferred time and date format and even provides a handy table of the current time around the world.
Toggle Auto-Emotes
See the list of Emote Keywords for more information.
Format:
/emote_toggle
- Toggles auto-emote keyword usage on or off. Auto-emotes are special keywords used in chat text, enclosed in* *, to perform an emoted action animation.
Example:
/emote_toggle- If the current setting is "Auto-emotes enabled", it will set it to "Auto-emotes disabled" (and vice-versa).
Ultravision Fix
Chat Format:
/uv_fix
- Workaround for the bug with ultravision/true seeing ending, that causes everyone (PCs and NPCs) to disappear (appear to be invisible). Also restores permanent ultravision to shadowdancers and palemasters, who can lose the effect when being knocked to bleeding.
NUI Format
/help ui
- This opens a NUI that provides a button to execute the same fix as above.
Unstick Fix
NUI Format:
/help ui
- This opens a NUI that provides a button to unstick your PC if they become lodged in the scenery.
Voice Throw
See the Voice Throw page for more information.
Format:
; [chat message]
- When a chat line begins with the
;prefix, the chat message will be spoken by the PC's companion, familiar or summoned creatures.
- Note: This requires that Auto-Emotes (using
/emote_toggle) be set to "enabled".
Walk
Format:
/walk parameter1
- Parameter1 (Defaults to toggle when omitted, i.e.
/walk):
on- Enables walk mode.off- Disables walk mode.
- A toggle specifically designed to allow elves to stay in walk mode as the Search button doesn't work for them. This also works for ALL races and persists on log out.
- Note: If slowed/encumbered, the PC will not move faster than their top speed. If hasted, they will walk hasted.
